

How To Repair Cbinet Drawer Fronts With Wood Stain Issues
Cabinets are the core of kitchens and bath, essential to both the form and function of these rooms. They provide disquisitional storage and are the major contributors to style and beauty. They're also amongst the most expensive and permanent fixtures and, considering of this, perform their duties for many years.
Wear and tear is merely natural. Doors sag, drawers stick, surfaces get dinged, and finishes article of clothing. This commodity will show you how to bargain with these problems and go on your cabinets operating smoothly and looking beautiful.
Repairing Chiffonier Surfaces
Pocket-size chips and nicks in wood cabinets can exist filled with plastic wood filler, sold in colors to match near forest stains. If the damage is to an area that'southward prominently visible, it may exist difficult to exercise a "seamless" repair. Test blending and colour matching in an unseen surface area before attempting a repair where visible.
When touching-upwardly a chipped or scraped cabinet, the play a joke on is to match the color. If you utilize the manufacturer's original pigment or stain colors, which you may be able to discover from a local distributor or cabinet retailer, be aware that the finish may accept faded over time.
You may have to paint an entire surface, starting and catastrophe at a cabinet edge, because spot impact-ups are more obvious on discolored cabinets, such as near cooking areas affected past rut and airborne grease and soot.
If wood cabinets are croaky or split up, gluing and clamping can brand the repair. Deep gouges and irreparable repairs can take a bit more effort:
ane Use a fine-toothed saw to cutting abroad the damaged area, making smooth, straight cuts. So cutting a slightly oversized replacement piece of the same cloth and fasten information technology with glue and, if necessary, minor finishing nails or countersunk screws. Sand the repair with fine sandpaper and so stain or paint to match the original.
2 If yous're dealing with a deep gouge, clean away the damaged forest then fill the surface area with an epoxy wood repair kit. Let to dry out, then sand and stain or paint to match. This material works amazingly well, and the repair is oftentimes as strong as the wood. Epoxy filler is waterproof so information technology can be used where the original woods damage was caused by moisture conditions.
Fixing Cabinet Doors
Cabinet doors that get a lot of use can, over time, go out of aligning for a diversity of reasons. If your cabinet doors droop, swing, or close poorly, accept the following steps:
Uncomplicated hinge adjustments are easy to brand, and many cabinets accept hinges that allow you to brand micro-adjustments in any direction.
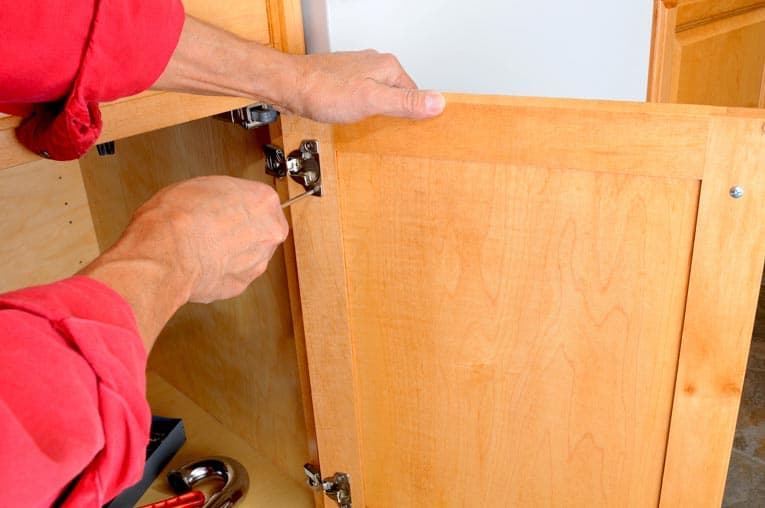
For plain hinges, loosen the mounting screws just enough so that the hinges tin move merely non and so much that the door droops. Prop up the door so that it is square with the chiffonier opening, using shims if necessary, and then re-tighten the screws.
Virtually European-manner hinges have congenital-in aligning gear up-ups, and at that place are several types. One has a unmarried screw connecting the ii halves of the swivel. Loosen this screw slightly and you lot can reposition the door vertically or horizontally, then re-tighten.

Another type of hinge has a sliding bar with a fix-screw for horizontal adjustments and a split up set up-screw for vertical adjustments. The newest hinges have snap-on mounting plates that allow yous to adjust both pinnacle and depth.
Adjusting Cabinet Doors
1 Tighten the hinge mounting screws. If this only helps for a while, or the holes are and then worn that the screws no longer concord, remove the screws one at a fourth dimension, squirt a piffling white glue into each hole, and so insert toothpicks into the holes. Wipe off whatsoever excess glue, and, afterwards the glue dries, cut the toothpicks flush with the surface using a utility pocketknife. So drive new screws into the refurbished holes (you may have to drill minor airplane pilot holes offset).
2 Replace the swivel screws with longer or larger screws. This usually requires drilling deeper pilot holes, which may non be possible with some cabinets, or using larger diameter screws, which may non fit the hinges as well as the originals. For these reasons, give this option careful consideration.
3 Motion the hinges. If the screw holes or mounting locations are badly worn, attempt shifting each swivel to a new spot where the forest is stronger. This works all-time if the hardware is hidden because otherwise the onetime locations will be visible, especially where the hinge leaves mount to the face of the doors. If yous do decide to get with this choice, you might also want to consider self-closing hinges, which eliminate the need for catches.
Removing Stubborn Shelf Paper
To lift sometime shelf paper, you'll want to warm and dissolve the adhesive backing. To first, peel upwardly a corner. Continue to lift as yous spray warm water on the backing. Stubborn residue tin can usually exist removed with vegetable oil. If you are removing the newspaper in training for painting, wash the shelf with sudsy water, rinse, and let dry completely.
Cabinet Drawer Repairs
Cabinet drawers tin accept a diverseness of bug that make them difficult or fifty-fifty impossible to use. They can become stuck, their glides can go damaged, or the boxes themselves tin can break. Overloaded drawers are often the cause, and then exist sure to avoid stuffing them besides full of heavy items or piling the contents too high. Too bank check that the runners haven't worked loose or been forced out of alignment.
Here are some measures you tin take to fix your cabinet drawers:
Stuck Drawer
A drawer or sliding shelf that'southward off its runway can be difficult to remove without damaging it fifty-fifty more. Try working the thin blade of a putty knife betwixt the drawer and the runner and and so gently tap the drawer back in line. If you're successful, the drawer slide volition pop into place and you can remove the drawer and correct the problem that made information technology sideslip its track in the beginning place.
Broken or Damaged Drawer Glides
Cleaved or damaged drawer glides have a way of reminding yous over and over that they need to be repaired. In some cases, the trouble is but that one or more of the mounting screws on the glides has fallen out. You can repair this past simply replacing the screw or screws.

More usually, the glides have become bent or cleaved. In this instance, the easiest remedy is to replace them.
For the smoothest, nigh problem-free drawer opening and closing, purchase prefabricated metallic ball-bearing glide sets that attach to the drawer bottom or sides, depending on your drawer'south structure and current type of glide.
ane Remove the drawer past pulling it out and then lifting the front to undo the drawer from its runway.
two Cheque the glides on the drawer and inside the cabinet. If they're only bent or misaligned, reshape them with a pair of pliers and slide the drawers back in.
3 If something is broken, unscrew the glides both from the drawer and from the cabinet.
4 Buy replacements at a hardware store or habitation comeback center. Exist sure to have along the complete glide set up (both halves) as a sample of what you'll need.
5 Screw the new glides to the cabinet and drawer and slide the drawer back in.
Cleaved Drawer Box
Drawers are sturdy but uncomplicated in construction. When they break, more often than not it's caused by either a separate in the forest or a glue articulation that has come apart. Fix splits by realigning and gluing together the broken pieces (use wood glue), and clamp them together for at to the lowest degree an hour. Do the aforementioned with separated joints, but kickoff carefully clean away as much of the old glue every bit possible, taking intendance not to harm the joint or the forest itself.
Featured Resource: Find Chiffonier Repair Help

How To Repair Cbinet Drawer Fronts With Wood Stain Issues,
Source: https://www.hometips.com/repair-fix/kitchen-cabinets-updating.html
Posted by: mcnamaraentakeeke.blogspot.com
0 Response to "How To Repair Cbinet Drawer Fronts With Wood Stain Issues"
Post a Comment